Are you a proud Chromebook user? Want to change read-only files stored on your Chromebook? If you are looking for a solution to delete or to change the read-only flagged files from your Chromebook, then this is the right place for you. This article explains how to change read-only files on Chromebook.
What are read only files?
One can change read-only files on Chromebook with just three simple steps. Read-only files mean the files can only be read, opened, or renamed, they can’t be removed or deleted from the system. Chromebook stores files on separate folders flagged with read-only. It means Chromebook users are not allowed to delete the downloaded or stored files easily from their system.
Before you delete read-only files on Chromebook, you need to first change the read-only files’ attribute. Without changing their attributes, you won’t be allowed to delete them from the Chromebook. So the first thing you need to do here is changing the read-only files.
Why do Chromebook stores files as Read only Files?
Chromebooks store files over the cloud as they come with limited storage space. When you download files from the internet or copy anything from external devices, the files will be saved as read-only files. This makes it easier for the system to store the files on a cloud platform. This prevents users from deleting the files accidentally from their system.
However, the same feature looks quite annoying to those who have limited space left. They want to delete the downloaded files intentionally from their Chromebooks, but not allowed as those files are stored with a read-only attribute.
If you are curious to know about how to change read-only files on Chromebook, then the following step-by-step guidelines will help you to do so. Let’s see how it is done!
Steps to Change Read-only Files on Chromebook
- Open your Chromebook and launch App Launcher. App Launcher icon is located at the bottom-left corner.
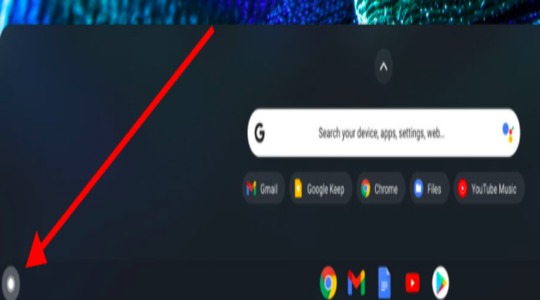
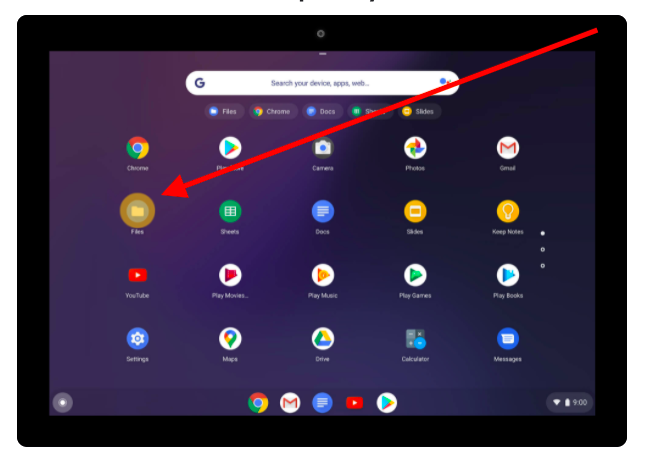
- Open App Drawer from the listed options. App Drawer is an application manager that shows all the installed apps on the Chromebook.
- From here, select the Files app. Files app is like a file manager where you can explore the photos, videos, and other files stored on your Chromebook.
- Now, select the file or folder to change the read-only attribute.
- Right-click on the file and select the Properties option. (If you see a three-dots option on the top-right corner of the file, select it and then click on the Settings option.)
- From here, just uncheck the read-only option to change the read-only attribute for that particular file. Once done, close down the window.
That’s all you have to do to change the read-only files on Chromebook. By changing this attribute, you can now delete all types of files such as photos, videos, documents, etc. from the Chromebook.
Since Chromebook stores file with a read-only attribute, you need to change the attribute for the files you want to delete from the system. There are third-party apps also available for Chromebooks that help you delete files from the Chromebook. You can use the Android File Manager app or can make changes to Google Drive’s settings to do so.
Right after changing the read-only attribute for the images and other files, you can delete those files permanently from the Chromebooks. There are many ways to delete images from your Chromebook. The different ways to delete images from your Chromebook are given below.
Ways to Delete Read-Only Files on Chromebook
Method 1: Delete Read-Only Files by Changing their Attribute
As noted above, once you remove the read-only attributes from the files, you can delete those files from Chromebook to make some space.
To do so, just select the file and click the Delete option. The Delete option now lets you delete the selected files.
Note: Read-only files will not show you the delete option (the delete option is greyed out.) After removing the read-only attributes, the delete option will be visible.
Method 2: Delete Images from the Downloads folder
To delete the images from your Chromebook, you need to delete them from their original folder i.e. the Downloads folder from where you have downloaded and store those images.
- Go to the Downloads folder by selecting the Files option.
- Expand My Files folder and select the Downloads option.
- The downloaded files can be seen here. If the files are saved in a different folder, select that specific folder to delete those files.
- Select the files or images you want to delete. The greyed Delete option will now be visible and allow you to delete the selected files. Select the files and then click on the Delete option to delete them permanently from the Chromebook.
Note: Before you delete any files from your Chromebook, you need to understand that the deleted files will not be recovered. Make sure you delete them only if they are not useful and occupy space unnecessarily.
Frequently Asked Questions
Question 1: Can I delete copied files from CD ROM directly?
No, you can’t! The files you copy from external devices will be stored with read-only files. To delete them from your Chromebook, you need to change the read-only attributes from those files by following the above-given method.
Question 2: I want to delete a set of images from my Chromebook but the Delete option is greyed out. Why so?
It is because the images are stored with read-only attributes which prevent you from deleting them. To do so, change read-only attributes for those images described above. After removing the read-only attributes, the delete option for those images will be visible.
Question 3: Can I use third-party apps to manage my Chromebook’s Storage?
Yes, you can use third-party apps from Play Store to manage your Chromebook’s storage space. To do so, you have to first enable your Chromebook for Play Store. Once the Play Store app is enabled, you can search for a suitable file manager app to manage the storage space on a Chromebook.
Final Words
This is how you can change read-only files on Chromebook. To delete images, videos and other files downloaded from the Internet need to be removed from their original folder on a Chromebook.
The files you see on the Chromebook are read-only files means you won’t be allowed to delete them without changing their read-only attributes. Go through the information given above, change the read-only attribute for files you want to delete, and delete them permanently to empty some storage space on your Chromebook.
Read These Articles..... How to Unfreeze a Chromebook?-(7 Easy Ways to Fix This Issue) How to Get iMessage on Chromebook?-(Follow 4 Easy Ways) How Do I Get My Chromebook to Recognize My Printer?-(Step-by-Step Guide) How to Play Minecraft on Chromebook Without Linux?-(Need to Know This) How To Fix a Chromebook Black Screen?-(Follow Easy Guide)
Did You find This Post Helpful? Share with others


