Are you here to find the easiest means to take a picture on your Chromebook because you couldn’t go for some reason? Sure, you are welcome. In this guide, I will share complete information on how to take a picture on a Chromebook for students. This guide is also helpful in learning techniques and software for taking pictures on your brand new or old Chromebook. Please keep reading!
Read More: MacBook Pro Screen Not Working But Keyboard Lit | What To Do?
Can You Take A Picture On A Chromebook Built For Students?
You are probably the student here to find the relevant information regarding taking a picture on a Chromebook.
And believe me, there is nothing difficult to learn in this regard. You just have to know what tools and how to do it.
So, it’s possible that taking a picture wouldn’t be difficult if your Chromebook had a webcam or a camera on its screen.
Therefore, I need your focus and attention to grab how it works when you need to take a picture on your Chromebook.
How Do You Take A Picture On A Chromebook For Students?
Taking a picture using your Chromebook camera is as simple as doing it on your android mobile phone. The better you know about these features, the faster it will be for you to take a picture.
Search for the camera option on a Chromebook for students in your Google Chromebook Search bar. Open the camera and click for a picture. You can also make videos if you want to. Besides, this camera option also offers some other features, including picture editing and formatting.
Hence, it’s simple if you haven’t done this ever before. Let’s clarify your understanding in a bit easiest way by explaining this to you step-by-step.
Step By Step Process To Take A Picture On A Chromebook For Students:
It’s simply taking a picture on your Chromebook. But you have to do it the right way.
Please look at the following steps assigned to make you understand and learn to take a picture on a Chromebook for students.
Step 1: Click On The Lower Left Google Launcher:
First, find the google launcher on the lower left corner of your Chromebook and click on it. A search bar window will appear, and you must type the camera inside it.
When you do that, click on the search button, and the camera of your Chromebook will appear. Click on the camera and go to the next step.
Step 2: Navigate Into The Camera Of Your Chromebook:
Now, take a closer look and navigate through your Chromebook’s camera features. Here, you can find all the options that a camera should provide.
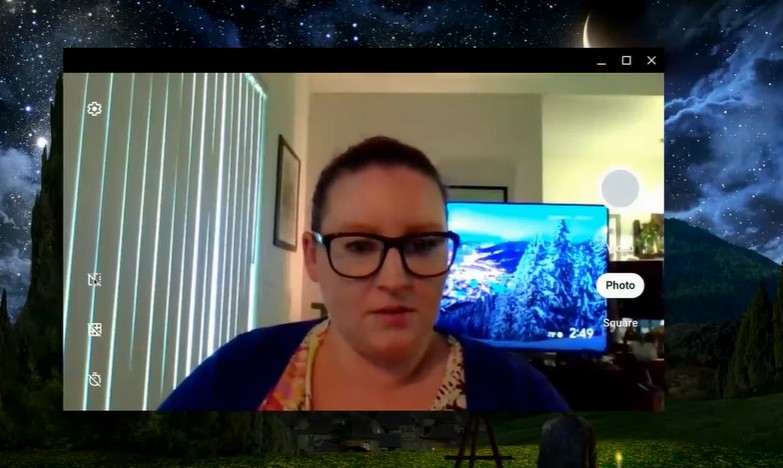
You can also see the Photo option in the camera. By clicking on it, your Chromebook will take a picture of the face appearing in that camera and save that picture in the dedicated location.
It can be in the storage where most of your pictures go in a file name with Pictures.
Step 3: Exploring The Camera:
When you explore this camera feature on your Chromebook, you will find similar options on your mobile, tablet, or any other laptop with a camera.
You can see the timer, front facing, and back video. Except, you can see the gridlines and multiple other features.
So, it is easy to understand something like this on your Chromebook!
Can You Take A Picture On A Chromebook That Doesn’t Have a Built-In Camera?
Yes, it is possible. Like, even if your Chromebook doesn’t have its own built-in camera, you can still take a picture on it.
But you will have to spend some money and buy a separately sold Webcam. Bring it home and fix it on your Chromebook.
Install the camera app from the Google Play store, enabling you to take as many pictures as you want on your Chromebook.
How Do You Explore Different Settings And Features Of Camera On A Chromebook?
It’s just not the picture you can take on a Chromebook. You can also learn about several other things.
It includes the following settings that help you understand the Chromebook camera better.
Change Camera Settings:
With this option, you can change the size of the grid, select any length for the timer and change the resolution of your camera as well.
Using Mirror:
You can flip the photo from the left to the right side by selecting the Mirror button.
Using Grid:
Using gridlines, you can straighten photos and change their total size from small to medium to large, depending on what you want.
Select Your Favorite Camera:
Suppose you want to use any other camera attached with your Chromebook. In that case, you just need to select the Switch Camera button.
With this, you can have any camera working on the front if you have connected two or sometimes three cameras with your Chromebook.
Using Timer:
Taking family pictures on a Timer function is always best if you want to take family pictures. For this, you can select the timer function and get whatever you want.
Using Volume Buttons:
When a Chromebook is used in tablet mode, you can press the up and down volume buttons to take a photo. It’s also simple and easier to do!
Read More: MacBook Pro Screen Backlight Not Working | What To Do?
The Bottom Line:
Seeing this far, it’s not very difficult to learn how to take a picture on a Chromebook for students if you know how to find and use its camera. All you need to do is find the camera on a Chromebook and select the photo button. You’ll see that the picture will be taken easily and impressively as you want.
So, thanks for reading and being here. Let me know your queries and suggestions. Have a pleasant day!
Read These Articles.....

How To Charge Laptop With Phone Charger? | Learn In 3 Steps
How To Add More Storage To MacBook Air? | 4 Easy Methods!
MacBook Pro Screen Backlight Not Working | What To Do?
Why Does My Dell Laptop Battery Drain So Fast? | Top 7 Solutions!
MacBook Air HDMI To TV Not Working | What To Do?
Did You Find This Post Helpful? Share with others